Instruction covered the following configuration: Keystone and Horizon under Apache Web Server with Shibboleth module as Service provider plus Shibboleth Identity Provider as Identity Provider. This configuration is based on SAML v2.0 specifications.
Shibboleth Identity Provider can be easily replaced with any other Identity Provider based on SAML. This fact makes the document usable for other configurations.
Although post describes one specific case it may be useful also for any other configuration of SSO with Keystone because instruction can be used not entirely but in part. This post also contains brief information about Security Assertion Markup Language (SAML) and gives common understanding of Keystone SSO system.
Introduction
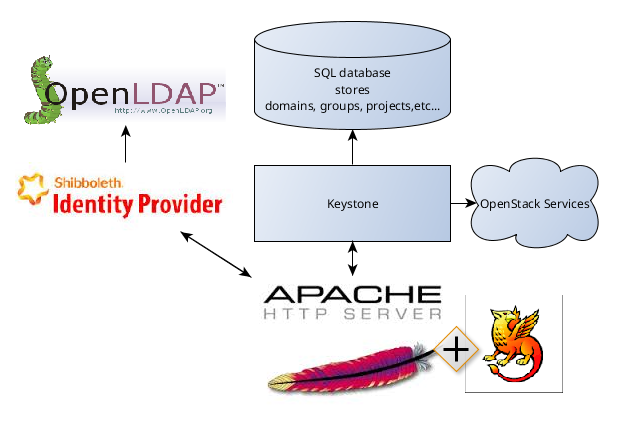
The SAML specification defines three roles: the Principal (typically a user), the Identity Provider (IdP), and the Service Provider (SP). In the use case addressed by SAML, the Principal requests a service from the Service Provider. The Service Provider requests and obtains an identity assertion from the Identity Provider. On the basis of this assertion, the Service Provider can make an access control decision – in other words it can decide whether to perform some service for the connected Principal.Let's consider following configuration:
Keystone as Service Provider (with Shibboleth Apache Module)
Shibboleth Idp as Identity Provider
OpenLDAP as storage for users

It is important that Shibboleth Apache Module and Shibboleth Identity Provider are different products. It is possible to use only one of them and replace other with different product. For example, it is possible to use Melon Apache Module instead of Shibboleth Apache Module or use any of identity providers (OneGate, Okta, etc...) instead of Shibboleth Idp.
Configure Apache
Keystone should be running under Apache:- Copy
httpd/wsgi-keystone.confto/etc/apache2/sites-available/keystone.conf - Enable keystone:
sudo a2ensite keystone - Enable Apache ssl module:
sudo a2enmod ssl - Install and enable Apache http-proxy module:
sudo apt-get install libxml2-dev
sudo apt-get install libapache2-mod-proxy-html
sudo a2enmod proxy proxy_http
- Restart Apache:
sudo service apache2 restart
Configure Keystone Service Provider
Service Provider (SP) - is a system entity that provides services to principals or other system entities, in this case, OpenStack Identity is the Service Provider.This approach to federation supports keystone as a Service Provider, consuming identity properties issued by an external Identity Provider - SAML assertions.
Federated users are not mirrored in the keystone identity backend (for example, using the SQL driver). The external Identity Provider is responsible for authenticating users, and communicates the result of authentication to keystone using identity properties. Keystone maps these values to keystone user groups and assignments created in keystone.
- Enable saml2 authentication method. Make changes in /etc/keystone/keystone.conf:
[auth]
methods = external,password,token,oauth1,saml2 - Install Shibboleth:
sudo apt-get install libapache2-mod-shib2 - Configure your Keystone virtual host and adjust the config to
properly handle SAML2 workflow. Append the following lines to the end of the file:
<Location /Shibboleth.sso>
    SetHandler shib
</Location>

<LocationMatch /v3/OS-FEDERATION/identity_providers/.*?/protocols/saml2/auth>
    ShibRequestSetting requireSession 1
    AuthType shibboleth
    ShibExportAssertion Off
    Require valid-user
</LocationMatch> - Edit the /etc/shibboleth/attribute-map.xml file to add the attributes:
<Attribute name="urn:oid:0.9.2342.19200300.100.1.1" id="uid" />
<Attribute name="urn:oid:2.5.4.4" id="surname" /> - Edit the /etc/shibboleth/shibboleth2.xml file to add the Keystone IdP entityID and MetadataProvider:
<ApplicationDefaults entityID="http://localhost:5000/">
...
   <SSO entityID="https://idp.local.org:8080/idp/shibboleth">
       SAML2 SAML1
   </SSO>
...
<MetadataProvider type="XML" uri="https://idp.local.org:8080/idp/shibboleth - Generate Shibboleth's key-pair:
sudo shib-keygen - Restart Apache:
sudo service apache2 restart - Enable shibboleth module:
sudo a2enmod shib2
Install Shibboleth Identity Provider
Prerequisites
- Install OpenLDAP. Create users.
- Install Java and set JAVA_HOME variable.
- Install Tomcat8
Install Shibboleth Identity Provider
- Download the latest Identity Provider software package.
- Unzip the archive you downloaded.
- Change into the newly created IdP distribution directory.
- Run either :
sudo ./install.sh - Installer will ask directory for installation, hostname for Idp, password. Use /opt/shibboleth-idp as directory and idp.local.org as hostname.
- Add hostname to /etc/hosts
Configure Tomcat Server
- Modify /usr/local/tomcat8/conf/server.xml file:
....
<Connector port="8080" protocol="HTTP/1.1"
      connectionTimeout="20000"
      scheme="https"
      proxyPort="443"
      proxyName="idp.local.org"
      redirectPort="8443" />
....
<Connector port="8443" protocol="org.apache.coyote.http11.Http11Protocol"
      maxThreads="150" SSLEnabled="true" scheme="https" secure="true"
      clientAuth="false" sslProtocol="TLS"
      keystoreFile="/opt/shibboleth-idp/credentials/idp-backchannel.p12"
      keystorePass="123456"
      keystoreType="PKCS12"
trustManagerClassName="net.shibboleth.utilities.ssl.TrustAnyCertificate" /> - Create /usr/local/tomcat8/conf/Catalina/localhost/idp.xml file. Add following content:
<Context docBase="/opt/shibboleth-idp/war/idp.war" privileged="true"
     antiResourceLocking="false" antiJARLocking="false" unpackWAR="false"
swallowOutput="true" /> - Add tomcat users: edit /usr/local/tomcat8/conf/tomcat-users.xml.
- Start tomcat:
sudo /usr/local/tomcat8/bin/startup.sh - Verify setup by signing onto the Tomcat Manager app with credentials from tomcat-users.xml. Go to: http://localhost:8080/manager
Configure Shibboleth Identity Provider
- Modify /opt/shibboleth-idp/conf/attribute-resolver.xml. We are going to use OpenLDAP backend - you can replace default attribute-resolver.xml with attribute-resolver-ldap.xml example and modify it:
<?xml version="1.0" encoding="UTF-8"?>

<resolver:AttributeResolver
        xmlns:resolver="urn:mace:shibboleth:2.0:resolver"
        xmlns:pc="urn:mace:shibboleth:2.0:resolver:pc"
        xmlns:ad="urn:mace:shibboleth:2.0:resolver:ad"
        xmlns:dc="urn:mace:shibboleth:2.0:resolver:dc"
        xmlns:enc="urn:mace:shibboleth:2.0:attribute:encoder"
        xmlns:sec="urn:mace:shibboleth:2.0:security"
        xmlns:xsi="http://www.w3.org/2001/XMLSchema-instance"
        xsi:schemaLocation="urn:mace:shibboleth:2.0:resolver http://shibboleth.net/schema/idp/shibboleth-attribute-resolver.xsd
                            urn:mace:shibboleth:2.0:resolver:pc http://shibboleth.net/schema/idp/shibboleth-attribute-resolver-pc.xsd
                            urn:mace:shibboleth:2.0:resolver:ad http://shibboleth.net/schema/idp/shibboleth-attribute-resolver-ad.xsd
                            urn:mace:shibboleth:2.0:resolver:dc http://shibboleth.net/schema/idp/shibboleth-attribute-resolver-dc.xsd
                            urn:mace:shibboleth:2.0:attribute:encoder http://shibboleth.net/schema/idp/shibboleth-attribute-encoder.xsd
                            urn:mace:shibboleth:2.0:security http://shibboleth.net/schema/idp/shibboleth-security.xsd">

    <resolver:AttributeDefinition xsi:type="ad:Simple" id="uid" sourceAttributeID="uid">
        <resolver:Dependency ref="myLDAP" />
        <resolver:AttributeEncoder xsi:type="enc:SAML1String" name="urn:mace:dir:attribute-def:uid" encodeType="false" />
        <resolver:AttributeEncoder xsi:type="enc:SAML2String" name="urn:oid:0.9.2342.19200300.100.1.1" friendlyName="uid" encodeType="false" />
    </resolver:AttributeDefinition>

    <resolver:AttributeDefinition xsi:type="ad:Simple" id="surname" sourceAttributeID="sn">
        <resolver:Dependency ref="myLDAP" />
        <resolver:AttributeEncoder xsi:type="enc:SAML1String" name="urn:mace:dir:attribute-def:sn" encodeType="false" />
        <resolver:AttributeEncoder xsi:type="enc:SAML2String" name="urn:oid:2.5.4.4" friendlyName="sn" encodeType="false" />
    </resolver:AttributeDefinition>

    <resolver:DataConnector id="myLDAP" xsi:type="dc:LDAPDirectory"
        ldapURL="ldap://localhost:389"
        baseDN="ou=People,dc=example,dc=com"
        principal="cn=admin,dc=example,dc=com"
        principalCredential="secret"
        useStartTLS="false">
        <dc:FilterTemplate>
            <![CDATA[
                (uid=$requestContext.principalName)
            ]]>
        </dc:FilterTemplate>
        <dc:ReturnAttributes>uid,cn,mail</dc:ReturnAttributes>
    </resolver:DataConnector>

</resolver:AttributeResolver> - Modify /opt/shibboleth-idp/conf/ldap.properties:
idp.authn.LDAP.ldapURL                          = ldap://localhost:389
idp.authn.LDAP.useStartTLS                      = false
#idp.authn.LDAP.useSSL                          = false
#idp.authn.LDAP.connectTimeout                  = 3000

## SSL configuration, either jvmTrust, certificateTrust, or keyStoreTrust
#idp.authn.LDAP.sslConfig                       = certificateTrust
## If using certificateTrust above, set to the trusted certificate's path
idp.authn.LDAP.trustCertificates                = %{idp.home}/credentials/ldap-server.crt
## If using keyStoreTrust above, set to the truststore path
idp.authn.LDAP.trustStore                       = %{idp.home}/credentials/ldap-server.truststore

## Return attributes during authentication
## NOTE: there is a separate property used for attribute resolution
idp.authn.LDAP.returnAttributes                 = passwordExpirationTime,loginGraceRemaining

## DN resolution properties ##

# Search DN resolution, used by anonSearchAuthenticator, bindSearchAuthenticator
# for AD: CN=Users,DC=example,DC=org
idp.authn.LDAP.baseDN                           = ou=People,dc=example,dc=com
#ldp.authn.LDAP.subtreeSearch                   = false
idp.authn.LDAP.userFilter                       = (uid={user})
# bind search configuration
# for AD: idp.authn.LDAP.bindDN=adminuser@domain.com
idp.authn.LDAP.bindDN                           = cn=Manager,dc=example,dc=com
idp.authn.LDAP.bindDNCredential                 = secret

# Format DN resolution, used by directAuthenticator, adAuthenticator
# for AD use idp.authn.LDAP.dnFormat=%s@domain.com
idp.authn.LDAP.dnFormat                         = uid=%s,ou=People,dc=example,dc=com

# LDAP attribute configuration, see attribute-resolver.xml
# Note, this likely won't apply to the use of legacy V2 resolver configurations
idp.attribute.resolver.LDAP.ldapURL             = ldap://localhost1:389
idp.attribute.resolver.LDAP.baseDN              = ou=People,dc=example,dc=com
idp.attribute.resolver.LDAP.bindDN              = cn=Manager,dc=example,dc=com
idp.attribute.resolver.LDAP.bindDNCredential    = secret
idp.attribute.resolver.LDAP.useStartTLS         = false
idp.attribute.resolver.LDAP.trustCertificates   = %{idp.authn.LDAP.trustCertificates:undefined}
idp.attribute.resolver.LDAP.searchFilter        = (uid=$resolutionContext.principal)
idp.attribute.resolver.LDAP.returnAttributes = uid,cn,mail - Modify /opt/shibboleth-idp/conf/attribute-filter.xml:
<AttributeFilterPolicyGroup id="ShibbolethFilterPolicy"
        xmlns="urn:mace:shibboleth:2.0:afp"
        xmlns:xsi="http://www.w3.org/2001/XMLSchema-instance"
        xsi:schemaLocation="urn:mace:shibboleth:2.0:afp http://shibboleth.net/schema/idp/shibboleth-afp.xsd">
    <!-- Release some attributes to an SP. -->
    <AttributeFilterPolicy id="releaseToAnyone">
        <PolicyRequirementRule xsi:type="ANY" />

        <AttributeRule attributeID="uid">
            <PermitValueRule xsi:type="ANY" />
        </AttributeRule>
        <AttributeRule attributeID="surname">
            <PermitValueRule xsi:type="ANY" />
        </AttributeRule>
    </AttributeFilterPolicy>
</AttributeFilterPolicyGroup> - Modify /opt/shibboleth-idp/conf/relying-party.xml. For for testing purposes just uncomment UnverifiedRelyingParty block. Do not use following configuration in production Read more: https://wiki.shibboleth.net/confluence/display/IDP30/RelyingPartyConfiguration
<bean id="shibboleth.UnverifiedRelyingParty" parent="RelyingParty">
    <property name="profileConfigurations">
        <list>
             <bean parent="SAML2.SSO" p:encryptAssertions="false" />
        </list>
    </property>
</bean> - Restart tomcat and apache:
sudo /usr/local/tomcat8/bin/shutdown.sh
sudo /usr/local/tomcat8/bin/startup.sh
sudo service apache2 restart
Configure Federation in Keystone
New users will not be added to the Identity backend, but the Identity Service requires group-based role assignments to authorize federated users. The federation mapping function will map the user into local Identity Service groups objects, and hence to local role assignments.Thus, it is required to create the necessary Identity Service groups that correspond to the Identity Provider’s groups; additionally, these groups should be assigned roles on one or more projects or domains.
- Create group “groupf”:
curl -i -X POST \
-H "X-Auth-Token: ADMIN" \
-H "Content-Type: application/json" \
-d '{"group": {"description": "federated group","domain_id": "default","name": "groupf"}}' \
http://localhost:5000/v3/groups - Create role “rolef”:
curl -i -X POST \
-H "X-Auth-Token: ADMIN" \
-H "Content-Type: application/json" \
-d '{"role": {"name": "rolef"}}' \
http://localhost:5000/v3/roles - Grant role “rolef”to “groupf” in “domainf”:
curl -i -X PUT \
-H "X-Auth-Token: ADMIN" \
http://localhost:5000/v3/domains/<domain_id>/groups/<group_id>/roles/<role_id> - Grant role “rolef”to some project as well:
curl -i -X PUT \
-H "X-Auth-Token: ADMIN" \
http://localhost:5000/v3/projects/<project_id>/groups/<group_id>/roles/<role_id> - Create a mapping. A mapping is a list of rules. Mapping adds a set
of rules to map federation attributes to Keystone users and/or groups.
An Identity Provider has exactly one mapping specified per protocol.
Mapping objects can be used multiple times by different combinations of
Identity Provider and Protocol.
curl -s -X PUT \
-H "X-Auth-Token: ADMIN" \
-H "Content-Type: application/json" \
-d
 '{"mapping": {"rules": [{"local": [{"user": {"name":
"federated_user"},"group": {"id": "<group_id>"}}],"remote":
[{"type": "uid"}]}]}}' \
http://localhost:5000/v3/OS-FEDERATION/mappings/keystone-idp-mapping - Create an Identity Provider object in keystone, which represents the Identity Provider we will use to authenticate end users:
curl -s -X PUT \
-H "X-Auth-Token: ADMIN" \
-H "Content-Type: application/json" \
-d
 '{"identity_provider": {"description": "idp", "enabled":
true}}' \
http://localhost:5000/v3/OS-FEDERATION/identity_providers/keystone-idp - Create a protocol. A protocol contains information that dictates
which Mapping rules to use for an incoming request made by an IdP. An
IdP may have multiple supported protocols.
curl -s -X PUT \
-H "X-Auth-Token: ADMIN" \
-H "Content-Type: application/json" \
-d '{"protocol": {"mapping_id": "keystone-idp-mapping"}}' \
http://localhost:5000/v3/OS-FEDERATION/identity_providers/keystone-idp/protocols/saml2
Get unscoped token
- Request in your browser (GET request):
http://localhost:5000/v3/OS-FEDERATION/identity_providers/keystone-idp/protocols/saml2/auth - You will be redirected to Shibboleth Idp login page:

- Enter credentials from OpenLDAP (use uid as login):

- You will get unscoped token


Horizon configuration
- Create /etc/apache2/sites-available.horizon.conf:
<VirtualHost *:80>
    WSGIScriptAlias /dashboard /opt/horizon/openstack_dashboard/wsgi/horizon.wsgi
    WSGIDaemonProcess horizon user=xusha group=xusha processes=3 threads=10 home=/opt/horizon display-name=%{GROUP}
    WSGIApplicationGroup %{GLOBAL}

    SetEnv APACHE_RUN_USER xusha
    SetEnv APACHE_RUN_GROUP xusha
    WSGIProcessGroup horizon

    DocumentRoot /opt/horizon/.blackhole/
    Alias /dashboard/media /opt/horizon/openstack_dashboard/static
    Alias /dashboard/static /opt/horizon/static

    RedirectMatch "^/$" "/dashboard/"

    <Directory />
        Options FollowSymLinks
        AllowOverride None
    </Directory>

    <Directory /opt/horizon/>
        Options Indexes FollowSymLinks MultiViews
        AllowOverride None
        # Apache 2.4 uses mod_authz_host for access control now (instead of
        #  "Allow")
        <IfVersion < 2.4>
            Order allow,deny
            Allow from all
        </IfVersion>
        <IfVersion >= 2.4>
            Require all granted
        </IfVersion>
    </Directory>
    <IfVersion >= 2.4>
      ErrorLogFormat "%{cu}t %M"
    </IfVersion>
    ErrorLog /var/log/apache2/horizon_error.log
    LogLevel warn
    CustomLog /var/log/apache2/horizon_access.log combined
</VirtualHost>

WSGISocketPrefix /var/run/apache2 - Add to /etc/apache2/sites-available.keystone.conf:
<LocationMatch /v3/auth/OS-FEDERATION/identity_providers/.*?/protocols/saml2/websso>
    ShibRequestSetting requireSession 1
    AuthType shibboleth
    ShibExportAssertion Off
    Require valid-user
</LocationMatch>

<Location /v3/auth/OS-FEDERATION/websso/saml2>
    ShibRequestSetting requireSession 1
    AuthType shibboleth
    ShibExportAssertion Off
    Require valid-user
</Location> - Set variables in horizon/openstack_dashboard/local/local_settings.py:
WEBROOT="/dashboard/"
LOGIN_URL = WEBROOT + 'auth/login/'
LOGOUT_URL = WEBROOT + 'auth/logout/'
OPENSTACK_API_VERSIONS = {
  "identity": 3,
}
WEBSSO_ENABLED = True
WEBSSO_CHOICES = (
      ("credentials", _("Keystone Credentials")),
      ("saml2", _("Security Assertion Markup Language"))
)
OPENSTACK_KEYSTONE_URL = "http://localhost:5000/v3"
WEBSSO_INITIAL_CHOICE = "credentials" - Modify /etc/keystone.keystone.conf:
[federation]
trusted_dashboard = http://localhost/dashboard/auth/websso/
sso_callback_template = /etc/keystone/sso_callback_template.html - Copy sso_callback_template.html to the /etc/keystone:
cp/opt/stack/keystone/etc/sso_callback_template.html /etc/keystone - Enable horizon, restart Apache:
sudo a2ensite horizon
sudo service apache2 restart
Login into Horizon
- You will have dropdown list with websso_choices:

- Select "Security Assertion Markup Language":

- You will be redirected to Shibboleth Idp login page:

- Enter credentials from OpenLDAP (use uid as login):

- You will be logged in as "federated_user" - name is taken from mapping:


This document helped me a lot !!!
ReplyDeleteThanks a lot
but i have to configured "sso_callback_template.html" in /etc/keystone directory otherwise it was thronging 404 Error. ( I have setup IDP and SP on different hosts and tested with KILLO version).
Vilash, thank you for your comment - I added step for template in the post.
DeleteAny tips on how you redirected the Logout link to Shibboleth.sso/Logout?
ReplyDeleteFound that LOGOUT_URL inside local_settings.py is not accepted (on Mitaka). What ended up working for me:
Deletea) Override the "logout" django url in /usr/lib/python2.7/site-packages/openstack_auth/urls.py with:
###
if utils.is_websso_enabled():
urlpatterns.append(url(r"^websso/$", views.websso, name='websso'))
urlpatterns.append(url(r"^logout_shib/$", views.logout, name='logout')) # <-- This will add a new logout endpoint, leaving the old auth/logout still valid.
###
b) Add a RewriteRule to apache conf for Horizon to redirect auth/logout_shib to the keystone Shibboleth.sso/Logout and IDP logout endpoints before returning to the horizon auth/logout page:
###
RewriteEngine on
RewriteRule "^(/dashboard/auth/logout)_shib/" "https://localhost:5000/Shibboleth.sso/Logout?return=https://myidp.com/idp/Logout?return=https://localhost/$1" [R,L]
###
Thank you for your question and the answer!
DeleteUnfortunately, I haven't try to redirect Logout link during my research, I'll do it as soon as I find time for it. And I'll check your solution.
There is typo here:
ReplyDelete(uid=$requestContext.principalName)}
"}" sign brakes LDAP search
Fixed. Thanks for noticing.
Deletehi,I got this error according to your document,Could you give me any tips?
ReplyDeleteidp.local.org/idp/profile/SAML2/Redirect/SSO;jsessionid=43C07EFE83E35EE1F3474661CA98EF25?execution=e1s1:6 POST http://localhost:5000/Shibboleth.sso/SAML2/POST 404 (Not Found)
onload @ idp.local.org/idp/profile/SAML2/Redirect/SSO;jsessionid=43C07EFE83E35EE1F3474661CA98EF25?execution=e1s1:6
This information is impressive; I am inspired by your post writing style & how continuously you describe this topic. After reading your post, thanks for taking the time to discuss this, I feel happy about it and I love learning more about this topic.
ReplyDeletebest openstack training in chennai | openstack course fees in chennai | openstack certification in chennai | redhat openstack training in chennai